
Island Batik Lone Star Blog Hop
- Brianna Roberts

- Dec 22, 2022
- 6 min read
Updated: Jan 29, 2023


This month as an Island Batik Ambassador, we were challenged to make a lone star quilt. This was a first for me. I have never made a lone star quilt and did not know where to begin. I was intrigued and nervous to attempt this design.
The lone star quilt design is one of the most recognizable designs known in the quilting community. It is also one of the oldest designs and quite traditional. As you may know, I am not traditional so I wanted to bring my own little twist to the design. I looked at many renditions and was inspired by the numerous ways this quilt pattern can be changed. I kept thinking that it reminded me of a kaleidoscope.
I was given the new Island Batik fabric line of Play Date that was designed by Kathy Engel. It is comprised of bright primary colors with 20 designs. It has a playful theme that includes stars, moons, toys and the sun. It is shipping to stores this month.


I decided that I would design a quilt that looked like a kaleidoscope. These colors would lend perfectly with the design and it reminded me of my childhood. The fabric and the quilt design meshed seamlessly and I thought it brought a modern take on a historical quilt pattern. I used Electric Quilt software to design my quilt. Putting together the sequence of colors took some time but I had fun playing with different looks. I finally came up with this pattern. In this pattern, I used 19 of the 20 fabrics in the Play Date line as well as Island Batik's solid black as a back drop. I was pleased with the final proposed quilt.


Now, how on earth am I supposed to put this together. I had no idea! I've never done this type of quilt before. Am I even qualified, LOL! As most people know me, I have never met a challenge that I wasn't willing to try. I went head first and started coming up with ways to sew this quilt. I did some research and spoke with the other ambassadors. I read blogs, watched videos and looked at books. One good book, that I used for inspiration and piecing was, "All-Star Quilts" by Helen Frost & Blanche Young. I did not use one of the designs in the book, but I used it for inspiration and instructions to strip piece a lone star quilt. Jennifer Thomas of Curlicue Creations suggested this book and it was a great idea.

There are multiple ways to piece and sew this type of quilt together. I racked my brain with numerous options. I like quick and uncomplicated so I went with a strip pieced quilt for my lone star sections, after that I used traditional piecing for the outer blocks surrounding the star.
The thing to note about this quilt in-particular is that the diamonds are all cut on the bias and there are many diagonal seams that meet at a 45 degree angle. It can be frustrating and tedious when piecing it together so that the seams match. Also there are several "Y" seams that are used in these quilts, but I avoided those because I designed my outer blocks so that I would not have to sew "Y" seams. I guess I am a wimp or went the easier route but everybody's path leads to a different destination. Taking your time is key to assure that seams match.

Once I started, it went rather well. I didn't have to seam rip too much, LOL so that's a plus. So how did I get started? Well, I decided to use 2 1/2" strips for my star sections. I cut the fabric into strips and laid out all the colors.
Every book and tutorial suggests to lay out the strips offset and on a diagonal from each other about 2"as you can see in the photo.
Each strip is sewn together and pressed. I sewed them together using coordinating Aurifil 50 wt thread and a microtex Schmetz Needle.

I used six fabrics in my sequence. After each strip was sewn together, I pressed them to form a six diamond unit. I continued to do this to form my pattern for my star sections.
Each star section had a design and the design is formed by placing the units in a certain order. The units are cut on a 45 degree angle in 2 1/2" strips to form the diamond units. The offset edge is trimmed at a 45 degree angle first to attain one straight edge. It is very important to lay the ruler down accurately when cutting a 45 degree angle. This angle must be maintained to continue to form the diamond strips.

I am left handed, so I am cutting from the left but if you are right handed, the process is the same but you will cut from the right.
Once all of the units are cut and the sequence has been determined, then the piecing of the star sections begins. This is where it can be tricky, but taking your time is important. It goes smoothly once you get the hang of it. I found that there was a rhythm to my technique and sewing.


Each diamond pieced strip section is sewn to an adjacent section. This is where precision counts. When placing the two sections together, using a pin at 1/4" away from the edge and over the cross section of where the seams meet is paramount to getting the seams to match. I used pins more than clips when piecing these sections. It ensured that my seams met and that helped with less seam ripping along the way. In the photo below and to the right, a pin is used to locate the seams where they will meet when sewn.


Each section is added and sewn until all form one point of the star. I pressed the seams open to reduce bulk. When pressing my seams, I used the Prairie Alpaca Pressing Mat to get a nice crisp pressed seam. It made a ton of difference when putting together the quilt top.


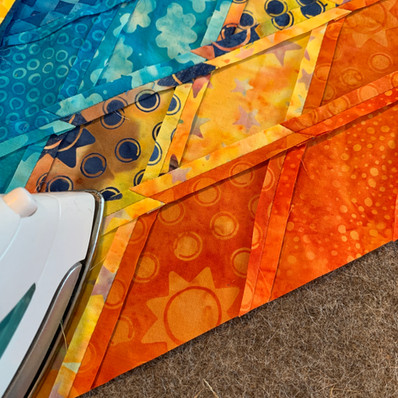

Now that each section was formed, this would be were the "Y" seams come in to add the outer blocks. "Y" seams do not have to be used if the star is not sewn together before the outer blocks are added. If the outer blocks are made using triangles, then they can be sewn to the star units without using the "Y" seams. I designed my outer blocks so that I could sew each triangle block to a star unit. I put the quilt top together and prepped it to quilt it. I quilted it and used Hobbs Heirloom 80/20 Black batting.
Quilt Size: 57" x 57"


Island Batik is offering a giveaway this week. You have an opportunity to win one of these precuts. Click on the picture or the link to enter for your chance to win. You can enter until Friday the 23rd of December. Good luck!
Enter Here:
It was a pleasure to make this quilt and I enjoyed learning about its construction and history. Thank you for following along on my quilt journey. I have enjoyed this year as an Island Batik Ambassador. It has been an honor to work with an amazing company and so many creative ambassadors. This opportunity has been wonderful. I am grateful for collaborating with a wonderful company and truly am touched by their generosity and kindness.

Products were provided by Island Batik fabrics, Schmetz Needles, Prairie Alpaca Spirit, Hobbs Batting and Aurifil thread.
Check out my fellow Island Batik Ambassador's projects. Their projects are fun and unique. Thank you for reading my blog and Happy Holidays.
Brenda Alburl ~ Songbird Designs Megan Best ~ Bestquilter Pamela Boatright ~ Pamelaquilts Elizabeth DeCroos ~ Epida Studio Jennifer Fulton ~ Inquiring Quilter
Preeti Harris ~ Sew Preeti Quilts Mania Hatziioannidi ~ Mania for quilts Jane Hauprich ~ Stitch By Stitch Custom Quilting Reed Johnson ~ Blue Bear Quilts Connie Kauffman ~ Kauffman Designs . Emily Leachman ~ The Darling Dogwood Denise Looney ~ For The Love Of Geese Leah Malasky ~ Quilted Delights Maryellen McAuliffe ~ Mary Mack Made Mine Anorina Morris – sameliasmum.com Lisa Pickering ~ Lisa’s Quilting Passion Claudia Porter ~ Create with Claudia Gail Renna ~ Quilt Haven Threads Brianna Roberts ~ Sew Cute And Quirky Michelle Roberts ~ Creative Blonde Gail Sheppard ~ Quilting Gail Andi Stanfield ~ True Blue Quilts Sandra Starley ~ Textile Time Travels Jennifer Thomas ~ Curlicue Creations Suzy Webster ~ Websterquilt
You can also find me on Facebook at: Sew Cute And Quirky and my Instagram Feed at: briannaroberts71


Pembahasan Pendidikan Pancasila Kelas 10 disajikan dengan alur yang jelas dan terstruktur. Materi dirancang untuk memudahkan pemahaman siswa. Mendukung pembelajaran yang lebih efektif.
Dengan Matematika Kelas 3, anak belajar berhitung secara bertahap dan menyenangkan. Penjelasan ringkas memudahkan pemahaman konsep dasar.
Setiap pertemuan Matematika Tingkat Lanjut Kelas 11 di UNICCM School disusun terstruktur untuk memperkuat konsep dasar dan penerapannya pada soal-soal cerita, membantu siswa siap menghadapi ujian sekolah dengan fokus dan efektif.
UNICCM School menerapkan Kurikulum Merdeka pada sistem pembelajaran. Materi disusun secara sistematis. Pendekatan ini mendukung pembelajaran berkelanjutan.
Very unique and modern take on the Lone Star. Beautiful job.