
Framed! A Spooky Halloween Picture Frame Pillow Tutorial
- Brianna Roberts

- Sep 16, 2022
- 5 min read
Updated: Nov 19, 2022


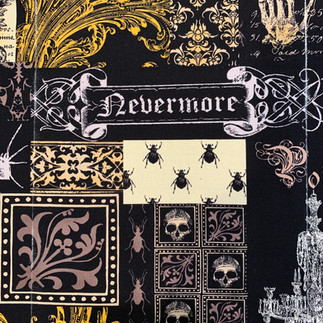
Are you excited about Halloween? I love Halloween and everything about it. It is a fun holiday and I love to celebrate the whole month. So let's get started early and make a picture frame pillow (18" x 18" finished). I used CX6636- Gray Freak Out, DC5522-Black Nevermore Collage, CX9739-White Creepin’ It Real and COCO fabrics from Michael Miller Fabrics.


Supply List:
3/4 yard for pillow backing and triangle picture frame end pieces (Creepin It Real-White spider webs)
Fabric for the pictures (Scraps can be used but some pictures are larger. Fussy cutting will be needed so if using fabric with a large print, I suggest getting a 1/2 to 1 yard to fussy cut (Nevermore Collage). Extra will be left over. I love this large print fabric!
1/4 yard for grey border (Coco- Smoke)
1/4 of a yard or scraps for the yellow picture frames (Coco-Marigold)
1/8 yard or scraps for the orange triangle picture frame end pieces (Coco-Tangerine)
1/4 yard for the black binding (Freak Out-Skulls)
Coordinating Thread
90/14 Quilting or Topstitch needle for quilting and 18/12 universal needle for piecing
Optional: 18 1/2" x 18 1/2" piece of batting
18" x 18" pillow form.
Cutting chart is listed below, but look at the fussy cutting directions for more details to center or choose a design.
Fabric | Cuts |
Picture: Top Left | 7 3/4" (Vertical) x 8"(Horizontal) |
Picture: Top Right | 5" (Vertical) x 6 1/2" (Horizontal) |
Picture: Bottom Right | 9 1/2" (Vertical) x 8" (Horizontal) |
Picture: Bottom Small Square Left Side | 3 1/2" x 3 1/2" |
Picture: Bottom Small Rectangle Left Side | 5 1/4"(Vertical) x 3 1/2"(Horizontal) |
Picture: Bottom Large Rectangle Left Side | 6 3/4"(Vertical) x 3.5" (Horizontal) |
Binding | Cut two: 2 1/4" x WOF and piece together |
Backing | Cut one: 10" x 18 1/2 rectangle Cut one: 12" x 18 1/2" rectangle Optional: Cut one 18 1/2" x 18 1/2" square for quilting the pillow top. |
Border | Cut two: 2" x 18 1/2" rectangles. Cut two: 2" x 15 1/2" rectangles |
Outer Web Frame | Cut four: 3 1/2" x 3 1/2" squares |
Web Frame For The Bottom Right Picture | Cut four: 3" x 3" squares |
Orange Frame For The Top Left Picture | Cut four: 3" x 3" squares |
Web Frame For The Small Square Picture | Cut four 1 1/2" x 1 1/2" squares |
Orange Frame For The Small Rectangle Picture (Bottom Left) | Cut four 1 1/2" x 1 1/2" squares |
Yellow Frame: Bottom Left | Cut two: 1 1/4" x 5" rectangles Cut two: 1 1/4" x 6 3/4" rectangles |
Yellow Frame: Top Right | Cut four: 1 1/4" x 6 1/2" rectangles |
Not all pieces are shown.


Fussy Cutting The Pictures:
Fussy cutting simply means that there is a particular design or picture that is desired on the fabric and used in a project. To fussy cut, decide on a picture and choose it. It will need to be centered. Use a ruler and chalk to mark it and then cut the the size needed for the project. The size needed will be cut to include seam allowances so note that a quarter inch around all sides will be in the seams. I centered the chandelier then cut it out. I centered the,"Nevermore" word along with the size needed, marked it with chalk then cut it out. Unfortunately, fussy cutting can and will waste fabric.


Now all pieces have been fussy cut as well as the frames, border, binding and backing. Let's start putting it together.
All seams are 1/4" seam allowance unless otherwise stated.
Triangle Frames:
Start with the triangle frames first. Gather all of the squares cut except for the largest ones (Put the 3 1/2" x 3 1/2" squares aside for later.)
Place the largest picture (Bottom right pictured) and place it right side of fabric facing up. Take a 3"x3" square and place it along one corner right side of fabric facing down. Draw a diagonal line from one corner to the other corner (This will divide the square into two triangles.).
Sew just inside the line drawn on the side closest to the outer edges. Place a ruler on the line sewn. Add a quarter inch seam allowance from the line sewn (Add the allowance along the seam that is toward the outside edge. Cut the excess triangle pieces and discard. Press the triangle out toward the corner. Repeat three more times with the other corners.


Repeat this process with the large upper left picture using four 3" x 3" orange squares. Repeat again with the small square picture and four 1 1/2" x 1 1/2" web spider web squares. Repeat with the small rectangle picture and four 1 1/2" x 1 1/2" orange squares.


Put all these picture frames aside.
Full Frames:
Take the top right picture and place it facing up. Take one yellow 1 1/4" x 6 1/2" rectangle and place it right side down along the top edge. Sew and press it. Repeat with the bottom edge then the two side pieces.


Repeat the same process with the bottom left large rectangle picture. Start with the side yellow pieces of the frame first (1 1/4" x 6 3/4") then the top and bottom pieces (1 1/4" x 5").


Putting It all Together:
The bottom left three pictures will be sewn together first. Take the bottom left rectangle and place it right side up. Put the bottom left square and place it right side facing down. Sew together along the top edge and press it. Now sew the two pictures to the larger rectangle along the vertical edge and press.


Take the top left picture and place it right side facing down over the bottom three pictures previously sewn together facing up. Sew along the top edge and press. Repeat the process with the top right and bottom right pictures.


Repeat the process to join the left and right side pictures frames.


Outer Border:
Take both the 2" x 15 1/2" grey borders and sew on the left and right side of the pillow top. This process is the same as adding the yellow frames to the two pictures. Now repeat with the top and bottom 2" x 18 1/2" grey borders.


With the pillow top right side facing up, take the four 3 1/2" x 3 1/2" squares and place them right side facing down on each corner. Repeat the same process as described in the Triangle Frame section.
Optional: Quilting The Top:
If choosing to quilt this project, now is the time to add batting and quilt it. I like to make a quilt sandwich with an extra piece of fabric that can be cut from the excess fabric left over from the white spider web frames (18 1/2" x 18 1/2"). The backing for the pillow has already been cut so this will be extra leftover that can be used. The top will shrink a tiny bit once quilted so when adding the backing, it may need to be trimmed.
Adding The Back Pocket Panel:
Take one backing piece. Press a 3/8" fold with wrong sides facing each other along the long edge of one side of the backing piece. Fold 3/8" again and press to hide the raw edge. Top stitch along the folded edge to enclose it. Repeat with the second backing piece.


Turn the pillow top over with the back side facing up. Put the backing pieces on the back side of the pillow facing up as well.
Note: This method will be using binding to conceal and encase the raw edges so the backing pieces are facing right side up or out. If you choose to not add binding, then the backing pieces would be placed right sides together facing the right side of the pillow and sewn. It can then be flipped and stuffed with pillow form.


The backing pieces will overlap. Now sew a 1/4" seam allowance along the perimeter of the pillow.
Binding:
This is a great way to conceal raw edges and add a decorative binding border. Take your binding and piece it together as you would with a traditional quilt. Fold over the binding wrong sides facing each other lengthwise and press.
Place the binding with the edge along the raw edge of the front of the pillow. Leaving a tail to close the binding edge, start to sew along the perimeter.
At each corner, stop sewing 1/4" from the edge. Fold up to form a triangle and fold back down over the triangle. Sew from the corner down the next side. Repeat until all sides are sewn. Leave a tail loose at the too. When the beginning and end meet, overlap a quarter of an inch. Trim it. With right sides together and the binding unfolded sew a 1/4" seam allowance to join the two ends. Sew the remaining of the binding down. There are other ways to join binding, this is one method.
Trim each corner without cutting into the seam to reduce bulk. Press the binding out toward the edge. Turn it over to the back and press again. Hold in place with clips. Stitch in the ditch or hand sew the binding on.


Stuff your pillow with a pillow form and decorate for Halloween!


Happy sewing and thank you for following along in my sewing journey.
These fabrics were provided by Michael Miller Fabrics. Thank you. Also check out the other bloggers on the hop. They have fun projects too (Michael Miller Blog).


Comments