
Learn To Use Monofilament Thread And Make A No Show Binding To Form A Scrappy Contemporary Quilt.
- Brianna Roberts

- Mar 10, 2021
- 5 min read


Do you have leftover fabric from a prior project? Maybe there are small scraps or larger pieces that can be used to make a quilt. For this month's Island Batik Ambassador Challenge, we were tasked to make a scrappy quilt.
Since I started my ambassadorship in January, I did not have a bunch of scraps but I did have leftover fabric from February's challenge. So I decided to use these leftovers to make a contemporary quilt. This quilt is comprised of skill builder blocks common in quilting, plus I added some quarter circle pieced blocks as well. I was inspired by contemporary art. I particularly liked the look of the abstract nature of Bauhaus art . This style started around 1919 in Germany and is comprised of prime colors with white or black stark backgrounds. It has clean lines and is quite architectural. This aesthetic also lent itself to quilt making quite well.

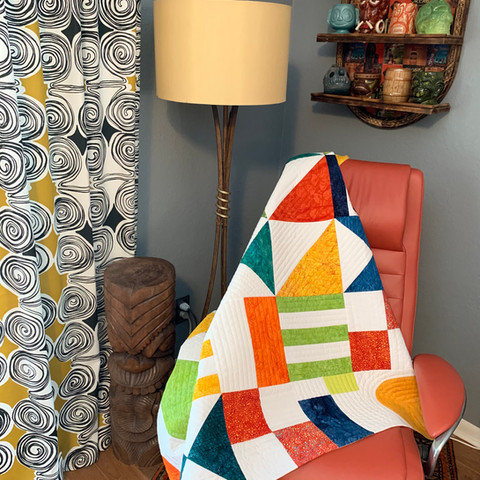
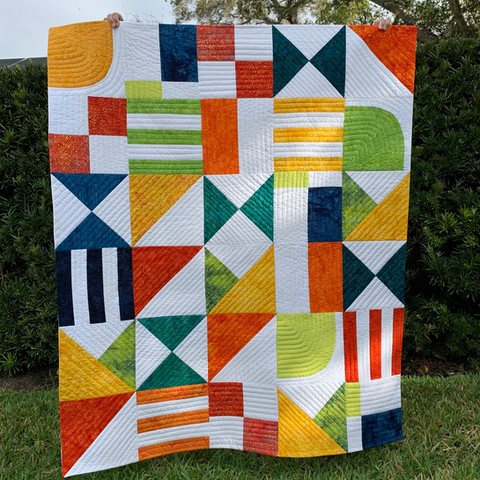
So I used my leftover fabric from Island Batik's Vincent's Garden Collection (Designed by Kathy Engle for the Quilt Rambler) to make this quilt. I decided to use oranges, blues, reds, greens and yellows. Each 10" finished block was pieced together using geometric shapes with a stark white background to make the colors pop and give it a contemporary look. I designed the quilt with an abstract and contemporary look in mind.


Although I did not have small scraps, I felt like this quilt still fell into the category of a scrappy quilt because I originally used these fabrics for another project. Also, I did not want to cut up larger pieces of fabrics to tiny pieces of fabric to put them back together again, LOL....
I added eight different blocks to my quilt and arranged them semi-randomly to decide the final layout. The quilt is ultimately a lap size and ended up being 50"x60". Perfect to throw over the couch. The best part is that there does not have to be an order to the blocks. It was fun to play with them by moving them around to determine the final look and layout.
After that I got started on quilting it. Well, I had a dilemma. White background and brightly colored blocks. Oh boy, now my topstitching is going to show and not look very good over the colored blocks if I use white thread or vise versa with colored or variegated thread over the white background. I decided to use monofilament thread . This will do the trick! It's clear, sturdy and just what I needed so that my quilt would keep its contemporary look.
Monofilament Thread Use Technique:
How to use monofilament thread? Don't be afraid to use it. Give it a try. The benefits are that you do not have to change thread colors, it is clear and launders well.
Do not put the monofilament thread in your bobbin, use it only on the top.
Use a thread net over the spool to keep it contained while sewing.
Lower the upper thread tension of your machine. Each machine is different so you may need to play with it. I set mine at a 2 where normally it is at 5.
Use 40wt or 50t thread in the bobbin that coordinates well with the background or back of your quilt.
Use an 80/12 topstitch needle.
Take your time quilting and use a walking foot.
And away we go......


Now for the binding, hmm.... what to do? I did not want a traditional binding because I felt like it wasn't right for this quilt. I didn't want the binding to show and I did not want sashing either. I also did not want to turn the quilt and flip it like a blanket. Well, I was in a pickle. What to do? What to do? A rather simple quilt had my head scratching to think up how to get the look I wanted.
I decided to put on a no show binding. This technique uses binding but it is pulled to the back of the quilt. The finished look from the front has no binding and the quilt blocks go to the edge of the quilt without sashing as well. This is what I wanted and knew it was going to be the look I was going for ultimately.
No Show Binding Technique:
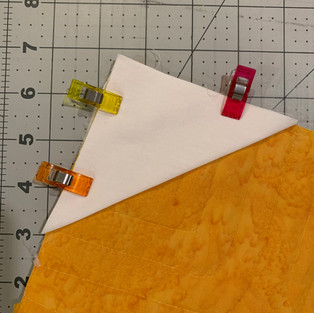
Cut a 4" square for each corner (It can be smaller as well. It is used to cover the binding edges and reduce bulk in the corners.).
Press it in half on the diagonal.
Place the raw edges of the folded triangle in each corner of the front of the quilt (Be sure they are placed on the front corners of the quilt.).
Sew a 1/4" seam allowance to secure it to the quilt.


Binding:
These binding strips are cut in smaller widths than customary bindings. I cut mine 1 1/4" wide each. 1 1/2" width can be used or smaller than 1 1/4" can be used too.
Cut 4 binding strips about an 1" to 2" shorter on each end of the quilt. This reduces bulk when turning it. A traditional binding can be used but it gets bulky in the corners because all of the binding is pulled to the back of the quilt.
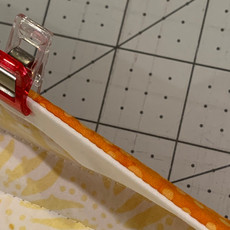
Press the binding in half lengthwise.
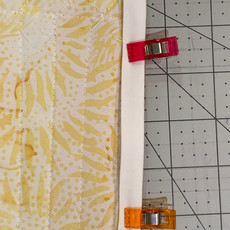
Pin or clip the binding to the front of the quilt along the edge and overlapping the corner triangles (The raw edge of the binding is placed along the raw edge of the quilt.). Sew a 1/4" seam allowance.


Turning The Binding To The Back:
Much like a traditional binding, it gets folded over to the back but a no show binding gets pulled further to the back so that it will not show in the front. This is why it is important to cut narrower binding strips.
Press the binding flat and out before turning it to the back of the quilt (This eases the process.)
Turn the quilt over to the back.
Optional: Adding seam tape is optional but it can make the process of turning the binding to the back of the quilt easier. If using seam tape, put it on along the binding and place it on the side of the binding that will be sewn down which covers the raw edges of the quilt.
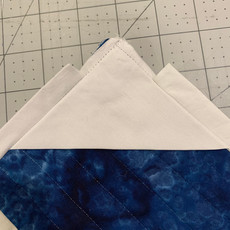
Flip the triangles in each corner to the back of the quilt. Push out the points gently.
Press the binding and triangles down to the back. This helps tremendously.
The seam of the sewn binding and the quilt will be along the edge of the quilt. The binding fold does not overlap the front and back of the quilt. All of the binding is to the back of the quilt with the seam on the edge. It will will hide the raw edge of the quilt.


Now the binding can be sewn down. Hand sewing the binding to the back of the quilt will give the quilt a seamless look in the front without additional topstitching. The binding can be machine quilted as well but keep in mind that the perimeter of the quilt will have top stitching and may change the look.
All done! No show quilt binding! Yeah!
All of the fabrics and supplies were given to me by Island Batik Fabrics , Hobbs Batting, Schmetz Needles and Aurifil Thread. This was a fun project and I enjoyed using different techniques to achieve a contemporary look.
This quilt pattern will be available by the end of April.


Such a creative and skill-building workshop 🧵✨ Learning to use monofilament thread and create a no-show binding opens new possibilities for contemporary quilting and textile art. Hands-on learning like this celebrates craftsmanship and innovation—values also shared by book publishers in dubai, who help preserve and promote creative knowledge through beautifully produced books.
"This is such a great tutorial! Learning to use monofilament thread and creating a no-show binding is perfect for making scrappy contemporary quilts look seamless and professional. For anyone looking to present their creative skills online, combining craftsmanship with the right personal branding is key — LinkedIn Profile Writing Help can really make your quilting expertise stand out to potential collaborators and clients."
Just learned how to use monofilament thread for a no-show binding my quilt looks so clean and modern! It’s amazing how small details make a big difference, just like polishing a thesis. If you need help with formatting or printing, professional thesis publication services can give your work that perfect finished look too!
Not only do I love the quilt (and of course the fabrics) but I totally learned something new with your no-show binding tutorial. Thank you!