
Let's Glow-O-Ween! Halloween is Coming!
- Brianna Roberts

- Oct 1, 2023
- 3 min read


It's that time of year again. I love Halloween! Decorating and making things for this holiday is the best. For my 4th quarter project for Benartex LLC, I decided to make a few different things. Trick or Treat bags and a door hanger are perfect to get into the Halloween Spirit. I had the pleasure of using the Glow-O-Ween fabric from Benartex. It is a fun and kitschy line. There are ghosts, mummies, black cats, witches and spider webs. The line also comes with a panel that has blocks on it that have cute sayings and pictures.

I had so much fun with this fabric that I ended up making five things. I made two pillows, two Trick-Or-Treat bags and one wall hanging. Halloween is my favorite holiday so I happily started on these projects so that the halloween spirit would be present no matter where I looked.
I started out with the wall hanging. Using the panel in this line made it fun and easy to add larger images to it. There are so many cute Halloween images to choose from. Each block was 8 1/2" with a total of six blocks. Three blocks used from the panel and three made up from a nine patch. The nine patch has squares and rectangles in it so it was a quick sew. I bound it added side back pockets for a dowel to hang it.

Next the Halloween Trick Or Treat bags. I made two because one was just not enough. The fabric is so festive and fun, that I figured why not two. A pattern will be available for this tote within the next month. It can be used with all kinds of fun fabrics. It is great for candy, books, clothes or putting your everyday essentials in it.


Lastly, I made two pillows. They were quick and easy to make.
Supplies Per Each Pillow:
1 Glow-O-Ween Panel for two blocks for each pillow
1 fat quarter of fabric for the backing for each pillow
1/4 of yard of fabric or scraps for each alternating block for each pillow
Polyfil.
Method Per Each Pill:
Cut two: 8 1/2" x 8 1/2" blocks from the panel. There are many to choose from.
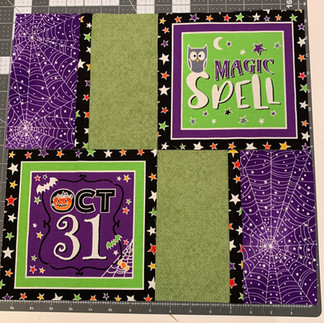
Cut four: 8 1/2" x 4 1/2"(Shown in black and orange) or cut four: 8 1/2" x 4" and two: 8 1/2" x 1 1/2"(Shown in purple and green)
One pillow has two blocks made with the 8 1/2" x 4 1/2" rectangles and the other pillow has two blocks made with the 8 1/2" x 4" and 8 1/2" x 1 1/2" rectangles.
Piece the blocks together. Choose between the two 8 1/2" x 4 1/2" rectangles or the 8 1/2" x 4" rectangles with the 8 1/2" x 1 1/2"rectangles.
Piece each block together to make an 8 1/2" x 8 1/2" block using a 1/4" seam allowance and sew. Add embellishments at this time. Ribbons or appliqué can be added.
Arrange the the blocks alternating with the panel blocks.
Sew all four blocks together to form the front of the pillow.
Cut a 16 1/2"piece square of fabric for the backing.
Place it right sides together over the front of the pillow.
Sew a 1/4" seam allowance around all four sides leaving about a 6" gap to fill the pillow with polyfil.
Trim the corners and turn the pillow right side out.
Fill it and sew the opening closed by hand stitching or machine stitching.


Thank you for following along in my sewing journey. These fabrics were provided by Benartex LLC.


Comments