
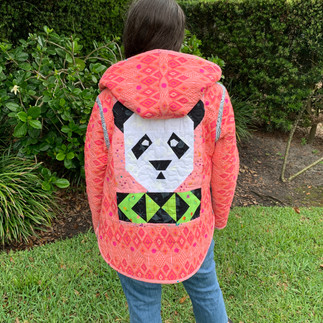
Quilty Jacket Love
- Brianna Roberts

- Apr 6, 2022
- 3 min read

Are you a quilter? Have you ever tried making a quilted jacket. Well, I decided to make a quilted jacket. It was a new experience for me. I have made clothes before but never a quilted jacket. I thought this would be a fun experience to try and I really enjoyed the process. Some of it was difficult because I made it it difficult on myself but I love the final outcome.

I chose the pattern, "The Tamarack Jacket" by Grainline Studio . I also used QuiltSmart interfacing and my beloved Tula Pink fabrics from FreeSpirit Fabrics . I did this to challenge myself to learn new techniques along the way. FreeSpirit is having this quilted jacket sew along so I decided to join in the fun.

I pieced my fabric together before quilting each section. I used the QuiltSmart interfacing to make the flying geese. I have made flying geese before but thought it would be interesting to try their interfacing. The sew along requires the use of a QuiltSmart product, the Tamarack jacket pattern and FreeSpirit fabrics. The QuiltSmart interfacing product is interesting because the flying geese are made in a row or at once. It is a time saver and a unique method. A strip of fabric is placed on top of the interfacing for the geese and fused. I decided to use several different pieces since I wanted to use some of my scraps. The two side pieces or contrasting fabric are sewn on after that.
After piecing and completing my design, I quilted each section. I decided to design a paper pieced panda to go along with the Tula Pink fabric theme. I designed it and pieced it together. I also used the QuiltSmart product to make the panda's bow tie and lapels. I quilted each section together.


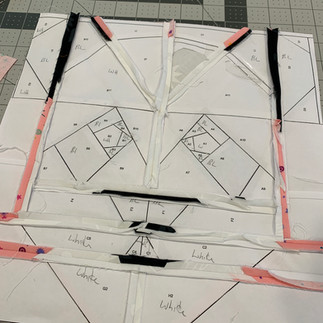


After quilting each section together, I cut out the front pieces, back, arms and hood. The pattern was straight forward and I could follow it easily. The trickiest part or difficult part for me was to center my panda and my flying geese on the back so that it was straight.


I wanted to add pockets and I wanted to add an inside pocket too. I added two front pockets and I used the pattern template to make the outside pockets and the inside pocket but I decreased the size of the inside pocket a bit so that when it was sewn in, it would still be usable. The pattern doesn't have an inside pocket but I wanted to have more utility for myself and make the jacket reversible. I designed a zippered pocket for the inside of the jacket.


Now putting it all together. It went together easily. It is bulky but taking your time sewing makes the difference. Using the right needles helps. I used a 90/14 denim needle and 100/16 denim needle. If you have sewn clothes before, the jacket is put together similarly like a shirt.
Once it is all put together, the binding is added much like binding a quilt. The biggest difference is that there are bulky portions under the arms and some hand sewing is needed along the arm where the sewing machine cannot reach. The binding gives it a pretty detail and a nice finished look. This makes the jacket reversible because I used binding throughout and chose not to serge the inside so I could turn it and use it on the pink side and black and white side. I used pink binding on the outside and black and white on the inside.


Lastly to make the jacket fully reversible, I also added Double Cap Snaps. When turning the jacket from one side to the other, there is a nice finished cap. These are easy to install. A small hand tool and hammer are needed and they don't cost much.


I have a fun jacket that is different from everyone else and it is unique. I learned a lot and enjoyed making it. If you want a unique piece of clothing, try making your own. It is a fulfilling process and enjoyable.
Thanks for reading my blog.


Very beautiful jacket and so creative. Love the colors very much! Have been wanting to try that pattern but had not noticed a hooded option. Great job and thanks for sharing that!